A complete tour, from opening the window to exporting Lottie. Ten minutes and you know it all.
Get started
Quit Illustrator, open Ilo-Animation-1.4.1.dmg and drag Ilo Animation onto Adobe Extensions (on Windows, run the Setup.exe). Open Illustrator, then Window › Extensions › Ilo Animation. The first time, paste the key from your purchase email (it starts with ANI-). One key works on two computers. You need the internet only to activate.
Open a document before you open the window: its layers come in as soon as you click in the window, and you can press play right away.
Illustrator comes first. Ilo Animation does nothing in the background: nothing runs while you work in Illustrator, while the window is hidden or minimised, or when Illustrator starts, and it never opens a document of its own. When you come back and click in the window, it looks at your document once and reads it again only if it changed (Sync reads it on demand). ✕ (top right) closes Ilo Animation completely; ⋯ › Uninstall… removes it from your computer.
The window
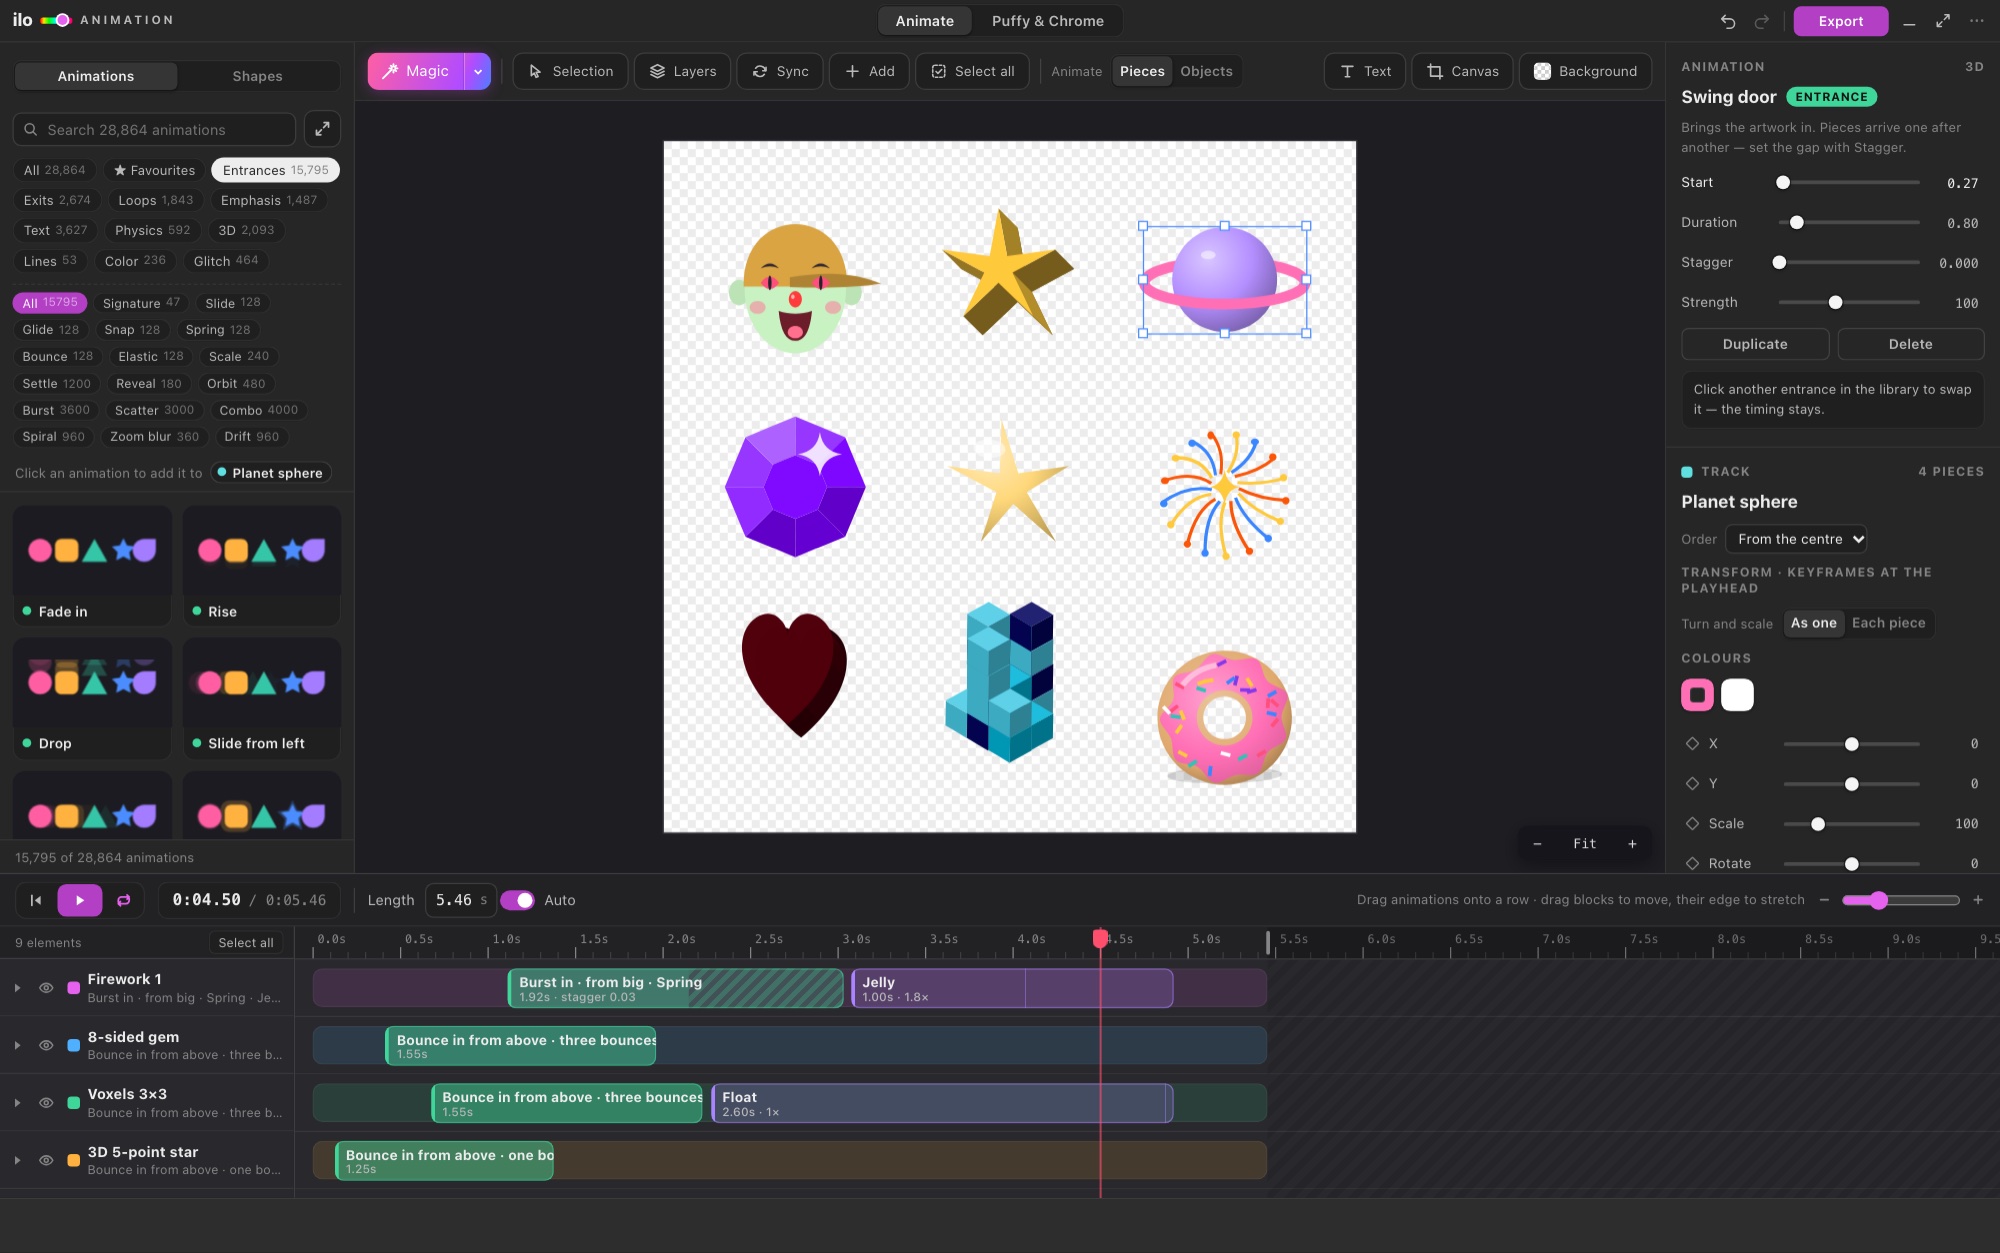
Point at any of the main controls and a card tells you what it does, with a small moving picture, its shortcut and Learn more (this guide). Left: the library, with Animations and Shapes; the button next to its search opens it in a window of its own: drag its title to move it, any edge to resize it, the slider for bigger or smaller cards, and ✕ (or Esc) to put it back. Everything you add from it flashes ✓ Added, and its title says what went where, so you know even when the stage is behind it. Middle: the stage, where your artwork plays. The canvas sits on a dark pasteboard, as in Illustrator: anything that moves off the canvas stays visible there, dimmed, so you can drag it back. Zoom with − / + or ⌘ + scroll (or pinch), scroll to pan, and Fit to see it all again. Right: the inspector, with the settings of whatever you selected. Bottom: the timeline. Illustrator keeps its panels inside its window, so when that window gets smaller the panel is squeezed with it: the stage and the timeline always stay in view, and in a small panel the bottom shows Timeline, Library or Element one at a time (drag the panel's edge to make it big again, or turn off Window › Application Frame in Illustrator to let panels float freely). Drag the line above the timeline to make it taller, and the edge of the names column to make it wider. The bar above the stage starts with Magic, then Selection, Layers, Sync, Add and Select all, and on the right Text, Canvas and Background (when the window is narrow they show as icons; point at one for its name). Top right: Open and Save for your .ilo project (the arrow next to Save has Save as…), then Export, minimise and full size. Right-click the stage or a row for the most used commands.
Layers & Sync
Ilo Animation reads your document when you work in its window: every object on your visible layers gets its own row, named as in the Layers panel. A group or a sublayer is one row; its small number button lists everything inside it, and clicking an item there selects it in Illustrator. Each row also says what it is (group, layer, shape, text) and, in documents with several layers, which layer it is on. Hidden layers are left out, locked layers come in without being unlocked, and art parked completely off the artboard is not part of the animation; the window tells you, and Bring onto the artboard moves it in for you.
Changes you make in Illustrator show up when you come back and click in the window (or press Sync), and every row keeps its animation. Nothing runs while you work in Illustrator, and no document window ever opens while it reads, so nothing jumps.
Layers opens the whole Layers panel of your document, as in Illustrator: every layer in its colour, and with the arrows everything inside it — sublayers, groups and the items in them (Open all opens every level). Tick what goes into the animation (a layer's box ticks everything on it) and press Animate: what you untick leaves the animation and stays out, what you tick comes in as rows. Click anything inside a group or sublayer to select it in Illustrator. Sync reads the document again after you change the artwork in Illustrator. Each layer finds its track again by name, so your animation stays. Use selection animates only what is selected, and Add adds the selection to the current animation. You can also drop SVG files onto the stage: one file replaces the artwork, several become layers.
Animate: Pieces / Objects decides what moves on its own: every letter and shape, or every object.
Magic
Magic (the colourful button above the stage, or right-click › Magic animation) animates the whole design in one go. It looks at every element: the biggest text becomes the title and comes in letter by letter, smaller text follows, the background fades in first, outlines draw themselves, confetti and dots scatter in, stars and bursts spin, hearts beat, speech bubbles pop, characters bounce and nod, arrows slide in from their side, 3D objects drop in. Shapes come in from the edge they sit nearest to, everything arrives in reading order, and each element gets a loop or an accent that suits it.
Press Magic again for a different take. The arrow next to it sets the Mood (Auto, Clean, Playful, Bold, Dreamy, Glitch), the Pace (Calm, Normal, Snappy) and Leave at the end, which makes everything exit again so the animation loops seamlessly. Select some rows first to animate only those. Everything Magic makes is ordinary blocks on the timeline: change any of them, and ⌘Z puts back what you had. It runs inside the extension, offline: no account, no credits.
Shapes
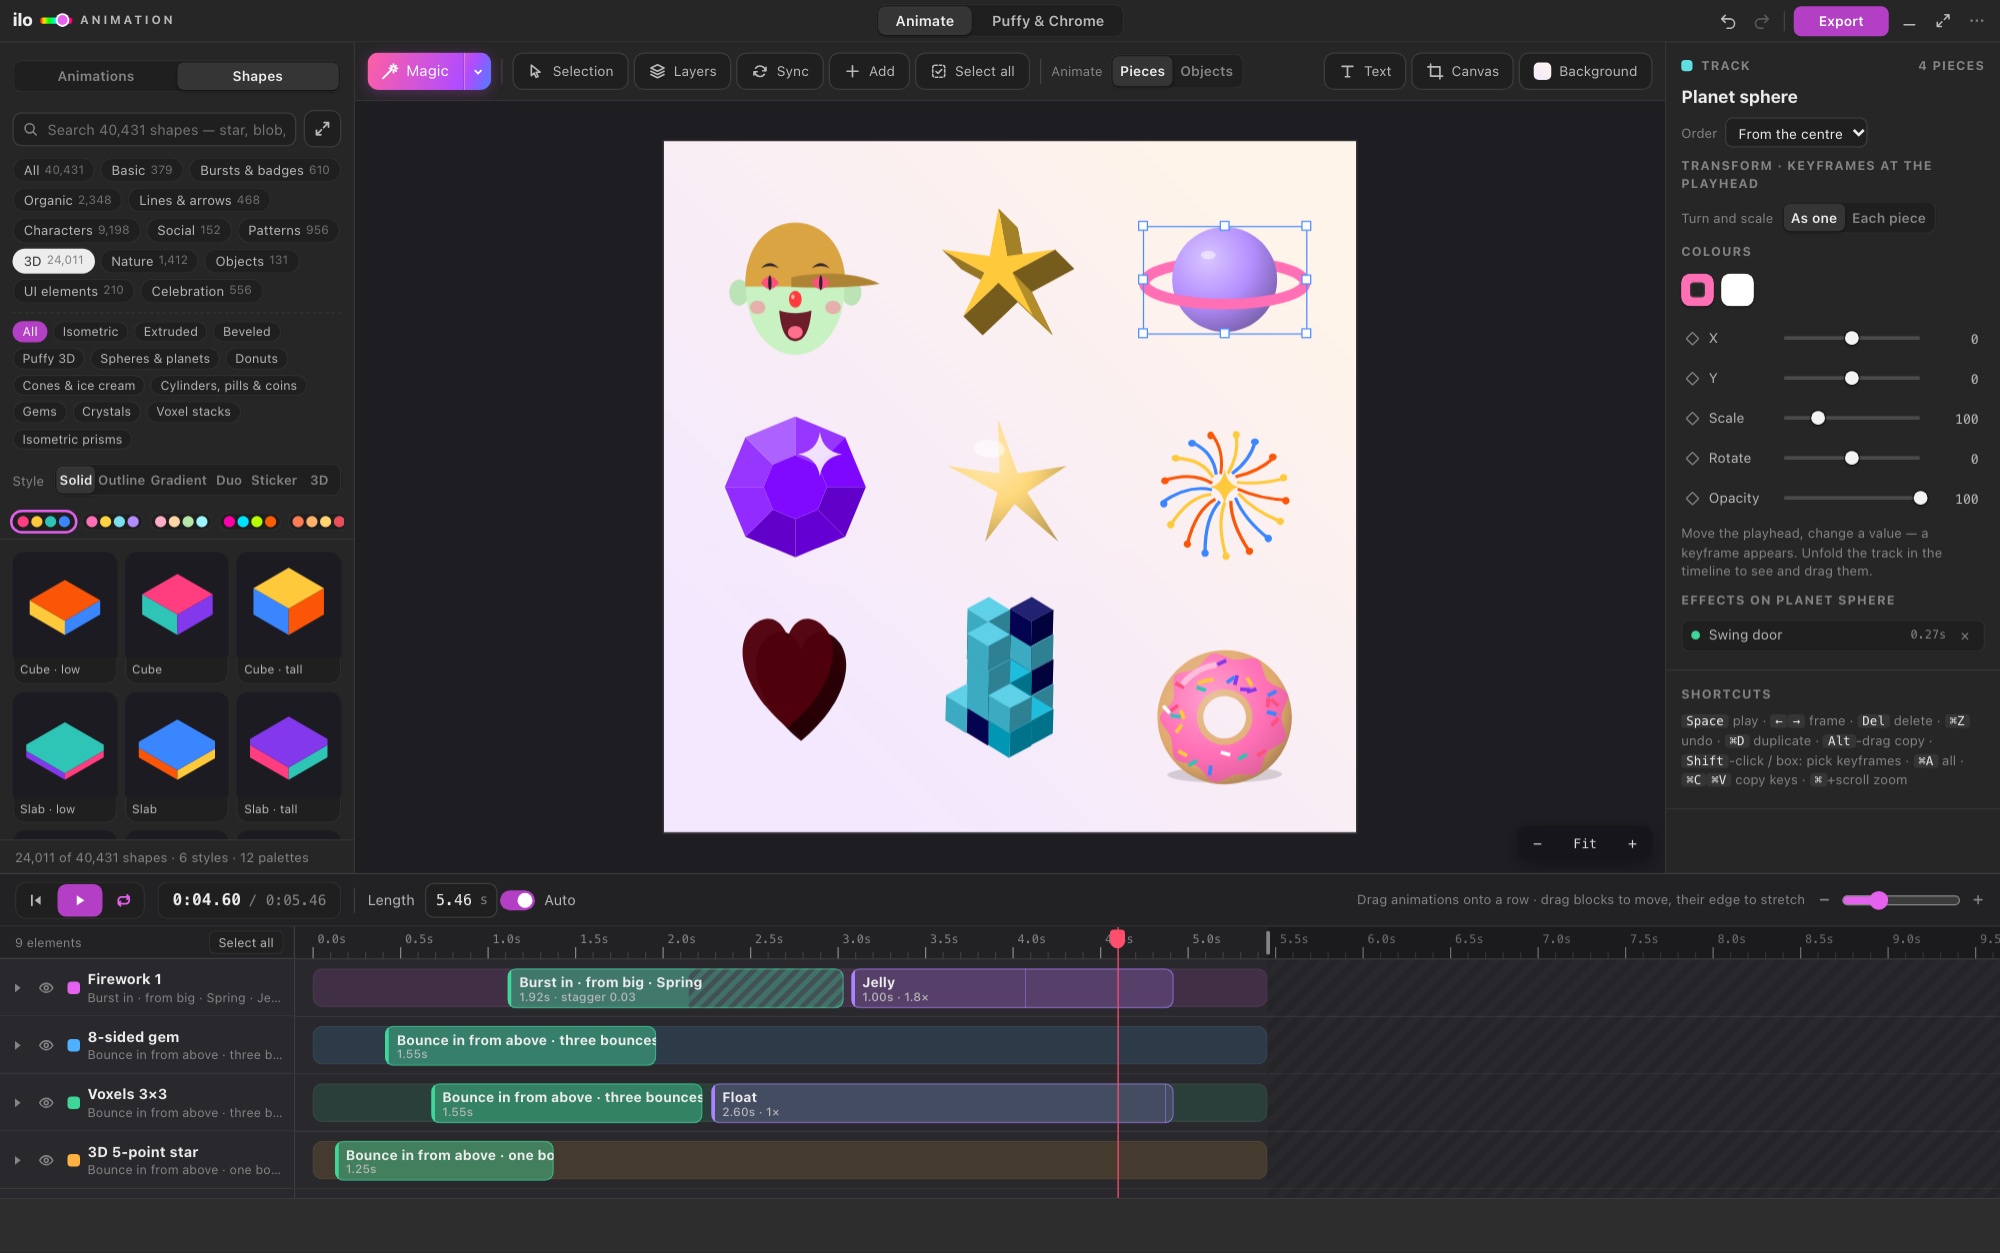
Switch the library to Shapes: 40,431 shapes in twelve groups. Basic (polygons, stars, rings, moons, hearts and geometric shapes), Bursts & badges (bursts, seals, flowers, sparkles, gears), Organic (blobs, clouds, drops and leaves, scribbles, spirals), Lines & arrows (waves, arrows, lightning, hand-drawn marks), Characters (7,200 faces built from head, skin, hair, eyes, brows, nose, mouth and extras, plus eyes, mouths, noses, hands in gestures, feet and shoes, bones and skulls, footprints, kiss marks), Social (speech bubbles, ribbons, frames, emoji faces), Patterns (confetti, dots, Memphis), 3D (extruded shapes with lit side walls in four directions and three depths, beveled, puffy, spheres and planets, donuts, cones and ice cream, cans, pills and coins, gems, crystals, voxel stacks and isometric prisms), Nature (snowflakes, flames, trees, mountains, suns, rainbows, plants, waves), Objects, UI elements (buttons, toggles, sliders, progress bars, cursors, icons, ratings) and Celebration (fireworks, streamers, balloons, party hats). Pick a Style (Solid, Outline, Gradient, Duo, Sticker, 3D) and a palette, and every card shows it.
Click a shape and it goes onto your artboard in Illustrator as vector art with its own name. It appears on the stage and as its own row, ready for an animation. Each new shape takes the next place in a 3 × 3 grid, so they never pile up. ⌘Z takes it out again. Every part of a shape is a piece, so in Pieces mode petals, confetti and dots move one after another.
The library
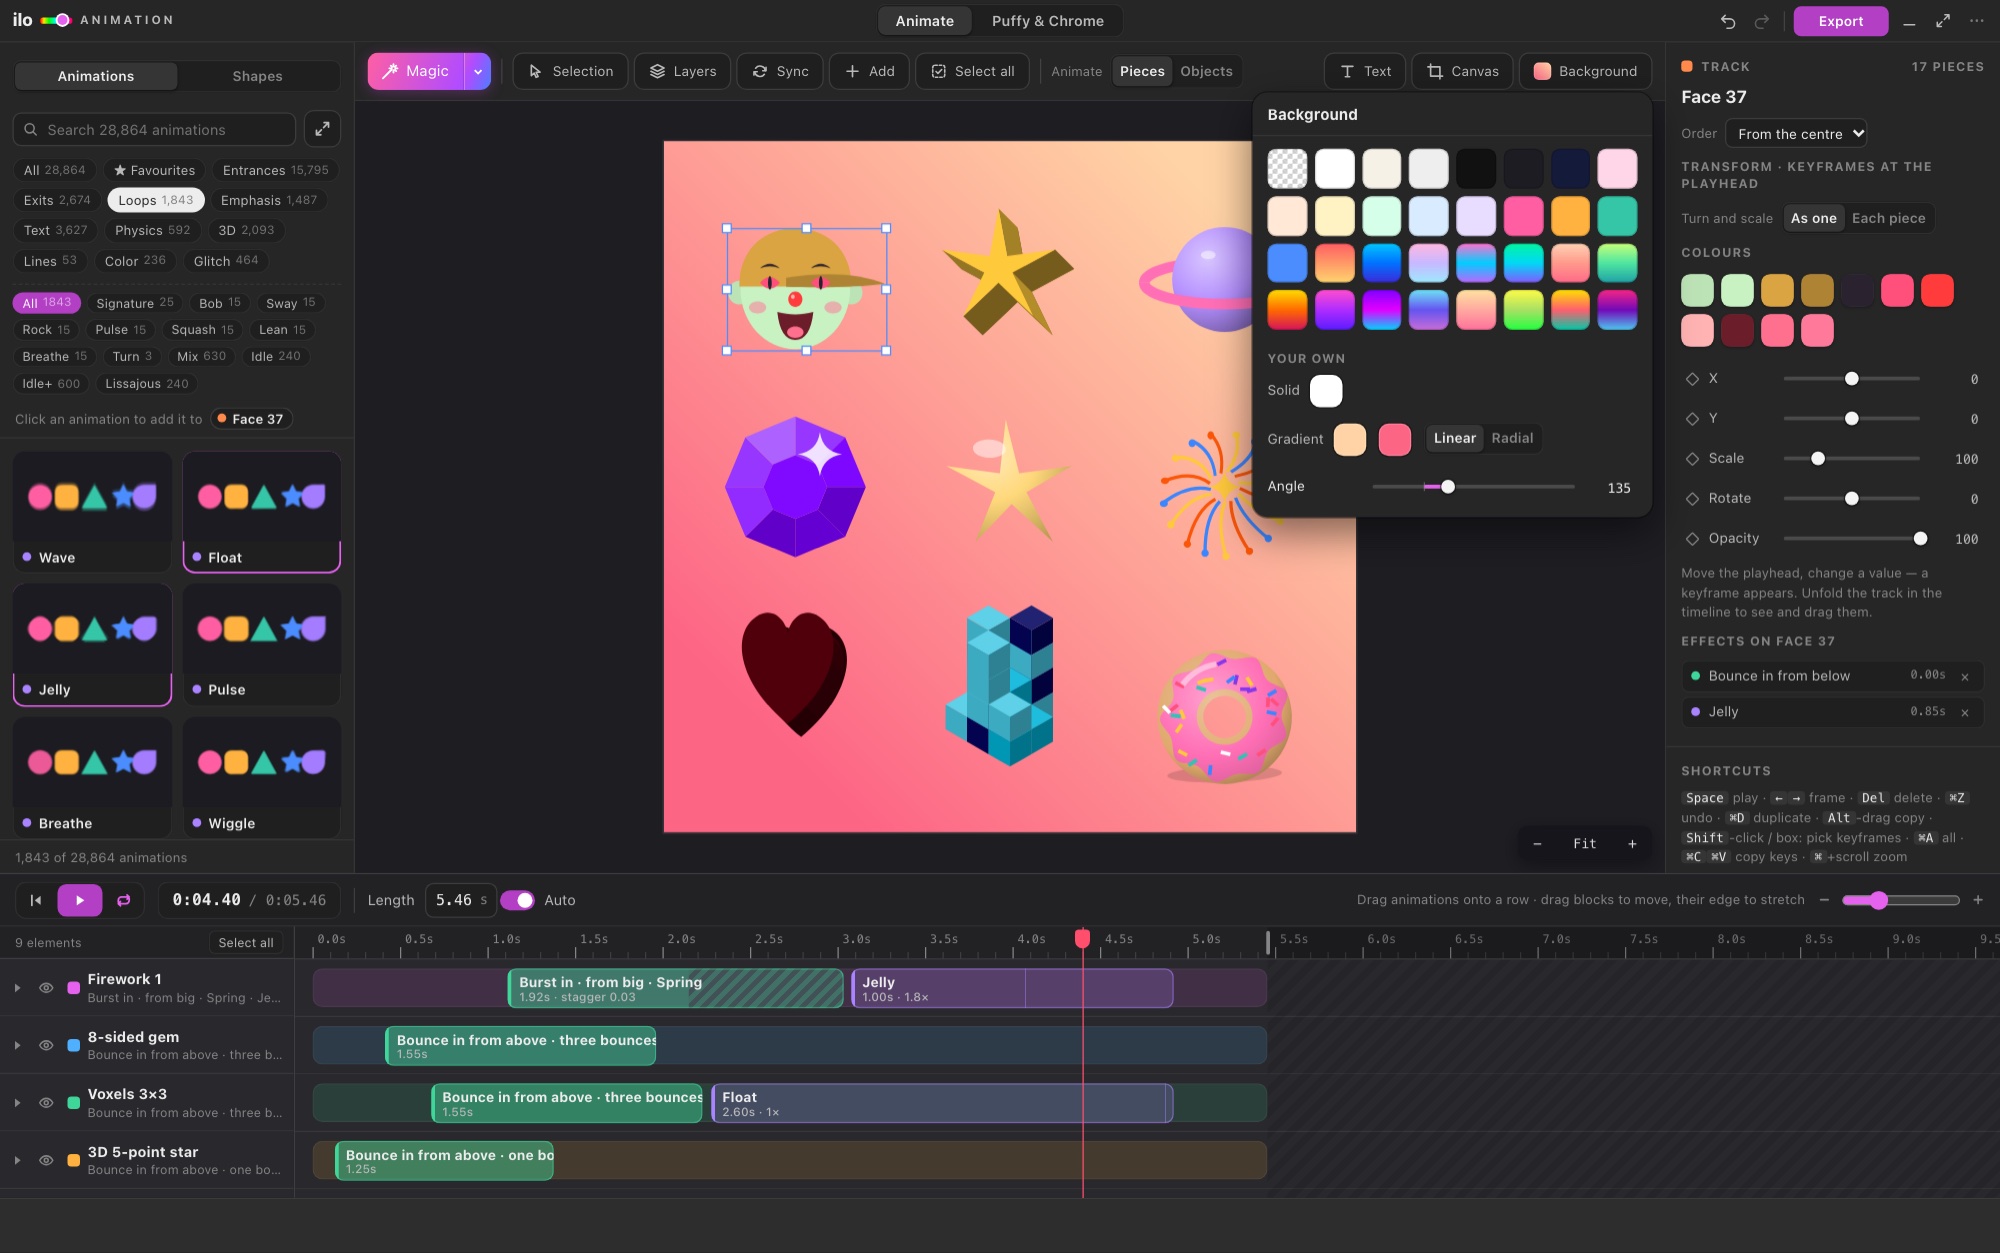
28,864 animations in families: Entrances, Exits, Loops, Emphasis, Text, Physics, 3D, Lines, Color and Glitch. Pick a category and a second row of chips shows its families: Signature, Settle, Reveal, Burst, Spiral, Hinge, Combo, Idle+, Lissajous and more. Search finds anything ("mask expo", "spring up", "neon"). Each card shows its move as a motion trail and plays on hover. ★ keeps your favourites.
Click a card to add it where it makes sense: an entrance at the start, a loop after it, an exit at the end, an accent at the playhead. Click another card of the same kind and it swaps, keeping the timing. Drag a card onto a track to drop it at an exact time.
The Pro animations use real motion-design curves (Quint, Expo, Material, Overshoot and a physical spring), secondary motion that leans and stretches with the speed, and mask reveals, where letters rise from behind a line that stays in place.
The timeline
Each track holds blocks. Green = entrance, purple = loop, blue = accent, orange = exit. The striped tail of a block is the stagger: pieces start one after another.
Drag a block to move it, even to another track. Drag its edge to change its length: entrances and exits slow down as a whole, loops repeat longer. Alt-drag copies a block. Everything snaps to the playhead, to other blocks and to keyframes. Hold Shift for no snapping. Click a block to set Start, Duration, Stagger, Strength and, for loops, Repeat for. Order on the track (left to right, from the centre, random…) decides who goes first.
Click the ruler or drag the red playhead to scrub. Length sets the animation's duration (Auto fits it to the blocks). ⌘+scroll zooms the timeline.
Rows: click a row to select it, Shift-click for a range, ⌘-click to add or remove one, or drag a box across the timeline (from any empty spot) to select every row it touches, and any keyframes inside it. Drag selected rows up or down to change what is in front. Every row has a bar along the time axis: drag the bar to move all of that element's animation in time (only that row; with several selected, all of them), click it to select just that row. Select all (⌘A) selects every row, and an animation you click then goes on all of them. With several rows selected, drag any of their blocks and all of them move through time together (keyframes too); on the stage, drag any selected element and they all move. Click one row, block or element to keep only it; click an empty spot (the empty part of the timeline or the stage, or the bars) or press Esc to let go. The eye hides a row from the preview and the exports. Stroke gives an element's outline its own row and animation. ⌘C / ⌘V copy and paste elements, in Illustrator too, and ⌘X cuts.
Every element has a bar that runs the whole length of the animation, so you can see it is there even before it has an effect; its blocks sit on top of the bar.
Keyframes
Unfold a track (the small arrow) to see Move X, Move Y, Scale, Rotate and Opacity. Move the playhead, change a value in the inspector, and a keyframe appears. The diamond next to each property adds or removes a key at the playhead, and double-clicking a lane adds one there too.
Select several: Shift-click diamonds, or drag a box over a lane. Drag any selected diamond and they all move together. ⌘A selects all, ⌘C/⌘V copy and paste them at the playhead. Delete removes the selection, and so does right-clicking a diamond. The inspector sets the easing for one key or for all selected keys: Smooth, Linear, Ease in/out, Overshoot, Bounce, Elastic or Hold. Turn and scale: As one / Each piece decides whether the track rotates as a group or every piece around its own centre.
Pieces on their own
Click any letter or shape on the stage to pick it (Shift-click picks more). Choose Animate separately and it gets its own track, starting with the same animation so nothing jumps, ready for its own moves and keyframes. The × on that track gives the pieces back.
Moving things on the stage
Click an element on the stage and it gets a frame with eight handles, as in Illustrator or Photoshop. Drag a corner to resize it (it keeps its proportions; hold Shift to stretch freely, Option to resize from the centre), or an edge to stretch it one way. The size holds in every frame and in every export, and ⌘Z undoes it. Drag a piece on the stage to move it. Its new place holds in every frame and in every export. Shift keeps the drag straight, and the arrow keys nudge picked pieces by 1 px (Shift: 10 px). Reset position in the bar above the stage puts them back where they were in Illustrator. On a piece with its own track and moving keyframes, dragging edits the keyframe at the playhead instead.
Colours
Select an element and the inspector shows its Colours: every fill and outline colour in it, as swatches. Click one and pick a new colour: it changes everywhere in that element, live on the stage, then in your Illustrator document (⌘Z in Illustrator undoes it). For shapes and text made in the window, the change is made right there. Gradients keep their own colours.
Text in your own fonts
Text opens a box for your words and a searchable list of every font installed in Illustrator, Adobe Fonts included: the font's name on the left and a sample in that font on the right. A live preview shows the text as it will be set. Set the size, Letter spacing (tracking, as in Illustrator's Character panel), Line spacing for several lines, colour and alignment, then Add to the canvas. The text always goes into the open Illustrator document, on the same canvas, as a group with its own row. Every letter can move on its own. Double-click the text on the stage (or its row) to change the words or the font. It is replaced in Illustrator and keeps its animation. Hebrew and other scripts are set right to left, and when a font has no letters for your text, a font that has them is picked for you.
Canvas & background
Canvas sets the size of the animation, and inside Illustrator it is your artboard: pick a size for social or video (square, portrait 4:5, story, Full HD, 4K, link preview) or type your own, and the artboard in your document takes that size around its centre (⌘Z in Illustrator undoes it), with the Ilo background following it. The button shows the current size. Adding bigger artwork never changes the canvas.
Background offers transparent, solid colours and gradients, plus your own colour or a two-colour linear or radial gradient at any angle. It goes into your Illustrator document as a Background rectangle behind everything (also in a new, empty document), and choosing another one replaces it. The background shows in the preview and goes into every export (choose Transparent in the export window to leave it out).
Projects
Save (top right, next to Export, and in the ⋯ menu) writes the whole animation (rows, blocks, keyframes, canvas, background, text and shapes made in the window) to an .ilo file. After that, Save writes your changes into the same file; Save as… (the arrow next to Save) makes a new one. Open brings a project back, and so does dropping an .ilo file onto the stage. Ilo Animation also saves your work by itself for every document: open the document again and your animation is back.
Export
Lottie JSON is for websites and apps. It plays in lottie-web and the LottieFiles players, and opens in After Effects. Masks, line drawing, colour changes and the background are kept. Animated SVG is one small file that plays in any browser with no script. GIF and Video (WebM) are for social posts and slides, at 480, 720 or 1080 pixels and 24, 30 or 60 frames per second. MP4 plays everywhere. Gradients inside your artwork stay real gradients in the preview, GIF and video. In Lottie and animated SVG they become their average colour.
Puffy & Chrome
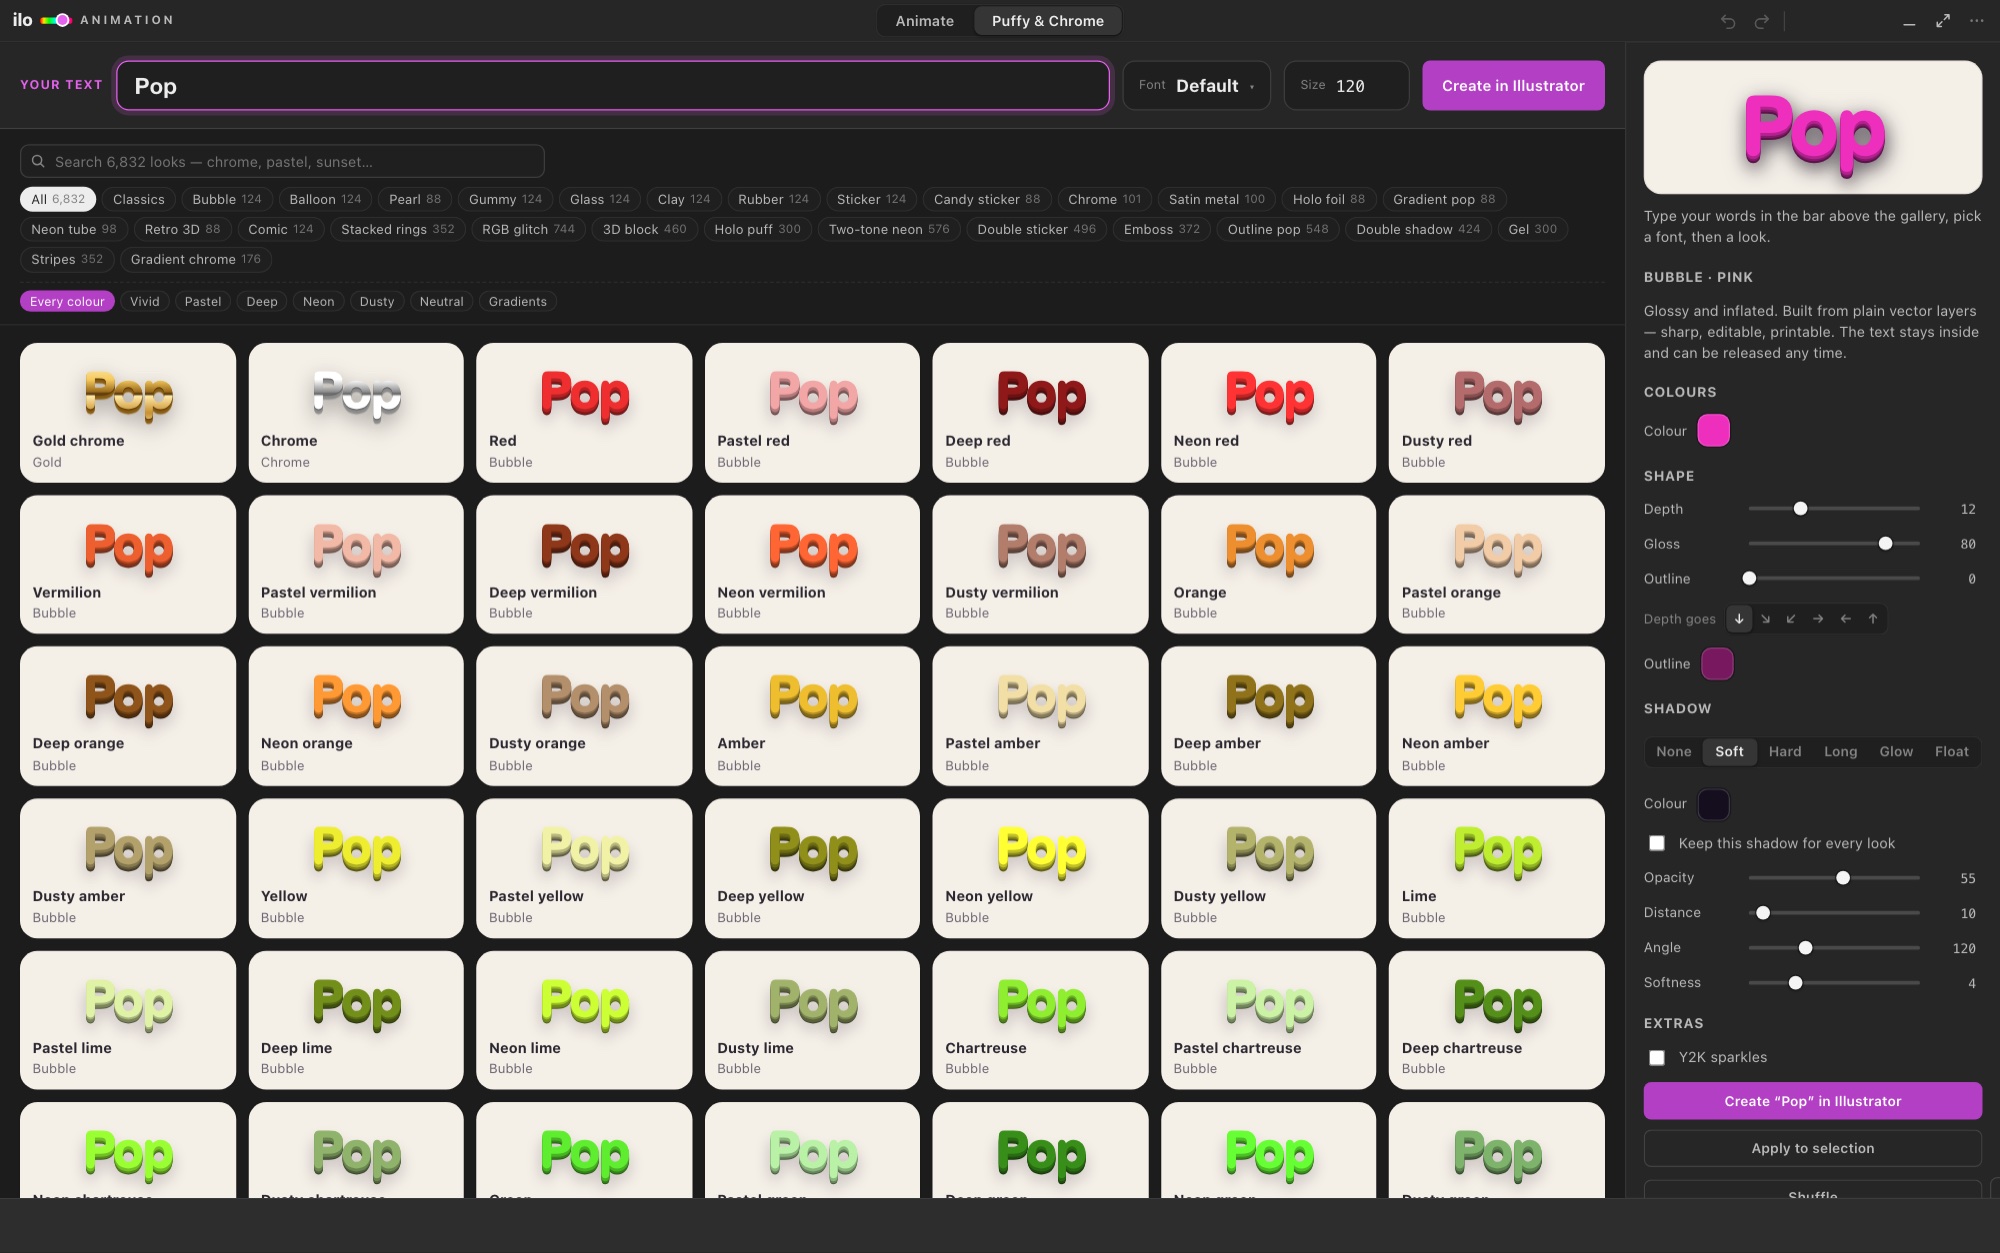
Type your words in the big Your text bar, choose a Font and a size, then pick one of 6,832 looks: bubble, balloon, pearl, gummy, glass, clay, rubber, sticker, candy, chrome, satin, holo, gradient, neon, retro 3D or comic, plus the wild collection (stacked rings, RGB glitch, 3D block, holo puff, two-tone neon, double sticker, emboss, outline pop, double shadow, gel, stripes, gradient chrome), in any colour. Every card shows your words. On the right, set the colours, depth and its direction, gloss, outline and rim, and the shadow: soft, hard, long, glow or floating, with colour, opacity, distance, angle and softness. Click a look and it goes straight into Illustrator: with nothing selected, your text is set on the artboard in that look; with styled text selected, it changes to the new look. Create in Illustrator always makes a new one, Apply to selection styles text or shapes you selected, and Release gives you the editable text back. The result is part of your document, so it appears in the Animate tab as its own row, and it keeps its name and its animation when you change the look.
Shortcuts
Space play / pause · ← → one frame (Shift: ten) · Home / End start / end · Delete remove the selection · ⌘Z / ⇧⌘Z undo / redo · ⌘D duplicate a block · ⌘A select all keyframes · ⌘C / ⌘X / ⌘V copy, cut and paste keyframes or elements · ⌘+ / ⌘− zoom the stage while the mouse is over the panel (⌘0 fits it) · ⌘ + scroll zoom the stage · scroll or the middle button: pan · ⌘E export · Esc close a popover, then let go of the selection · arrow keys nudge picked pieces.
Pro tips
Start with an entrance from Reveal or Settle, add a quiet loop from Idle, and finish with a matching exit. It always looks finished. Keep Stagger between 0.04 and 0.08 s for type. Use one accent from Hit on the word that matters. For logos, switch to Objects so each part moves as one. For websites, export Lottie at 30 fps. For social, a 1080 GIF or video.
Troubleshooting
Nothing came in when I opened the window. Open a document with visible artwork and press Sync. A layer is missing. Hidden layers are skipped. Show it in Illustrator, then press Sync. Video export is not available. Older Illustrator versions can't record video. Use GIF or Lottie. "The active layer is locked" when creating Puffy text. Unlock or pick another layer.
Still stuck? Contact support.